Onboarding
Supported test materials
Several versions of the DEM Test have been published over time, and Easy DEM currently supports the following versions:
- v2.8 2016 (default)
- v1.0 1987
Interface
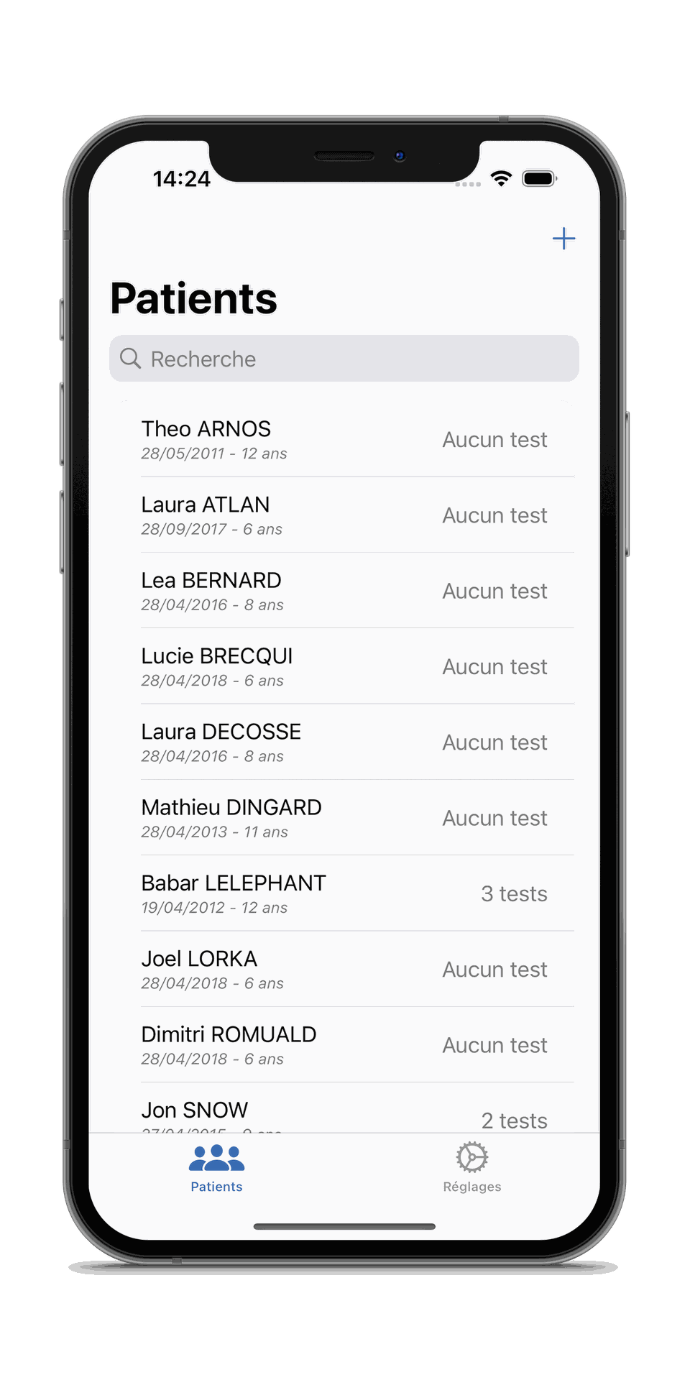
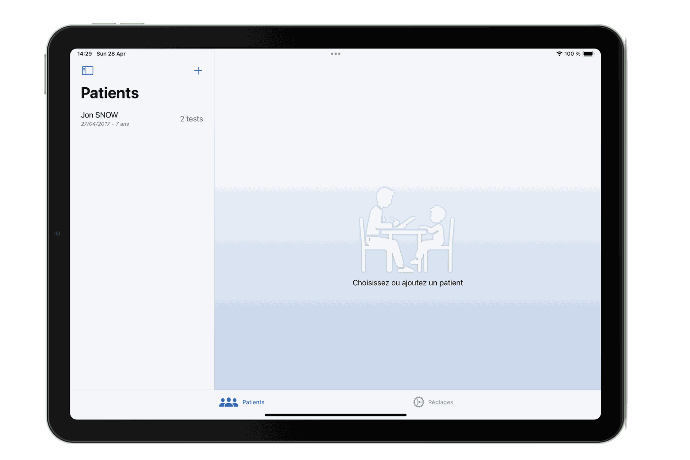
Easy DEM is built around a bottom navigation bar, allowing navigation between the main workspace and the application settings. On iPad, the patient list is moved to a side navigation bar, making it easier to use. On Android tablets, the display remains similar to the mobile version.
Features
The Easy DEM application incorporates numerous unique features:
- Stopwatch: No need to use your watch, never take your eyes off the test.
- Video Recording: Easy DEM can record the entire test, allowing you to view it again later. Refine, correct, detect, and adjust your diagnosis
- Draft Saving: In case of mishandling, don't panic, Easy DEM stops the stopwatch and saves the test in the patient's drafts.
- Multilingual: You can set a custom language for each patient. An English patient? No problem!
- Simplified Search: A search bar assists you in the patient list to quickly find your patients.
- Optimized for iPad: The application has a more comfortable interface on iPad, taking advantage of the larger screen size.
* iOS/iPadOS only
Configuration
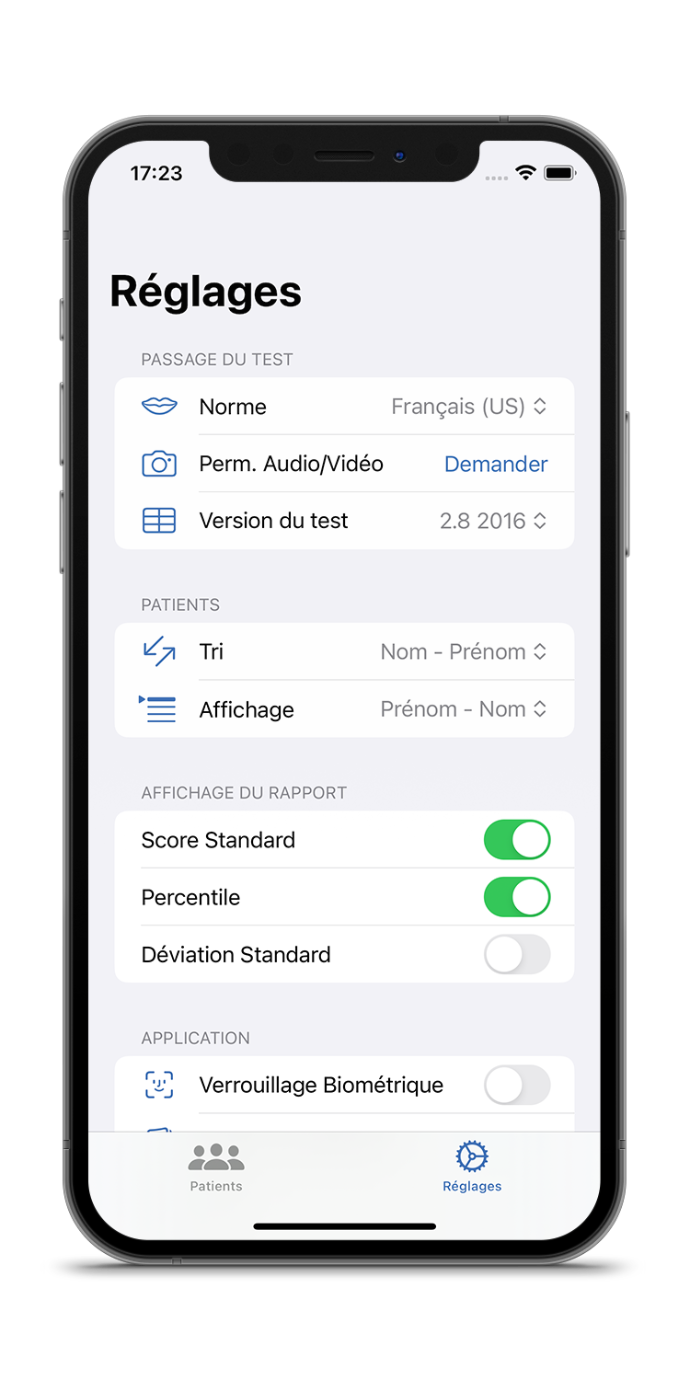
The settings page helps you configure your app to your needs
Test Administration
Norm
Upon first launching the application, the language of your device is detected. If a dataset is available for that language, it is selected. Otherwise, English will be chosen by default.
As of May 1st 2024, the available languages are English and French.
Audio/Video Permissions
The application needs access to your microphone and camera for recording; anticipate granting them through this setting.
Test version
From version 1.1.0, it is possible to use multiple versions of the test materials. The selected setting will be applied by default to all new tests.
Patients
Sorting and displaying the patient list.
Report Options
Multiple result visualization options are available.
By default, the report will display the metrics recommended by the DEM Test manual (standard score and percentile).
It is also possible to display the standard deviation by enabling the option.
Application
Biometric locking allows locking access to the application as soon as it goes into the background. Biometric locking uses TouchID or FaceID, depending on your mobile device.
Patients
Create, Edit, Delete
From the patient list, use the "+" to create a patient; the creation interface then appears.
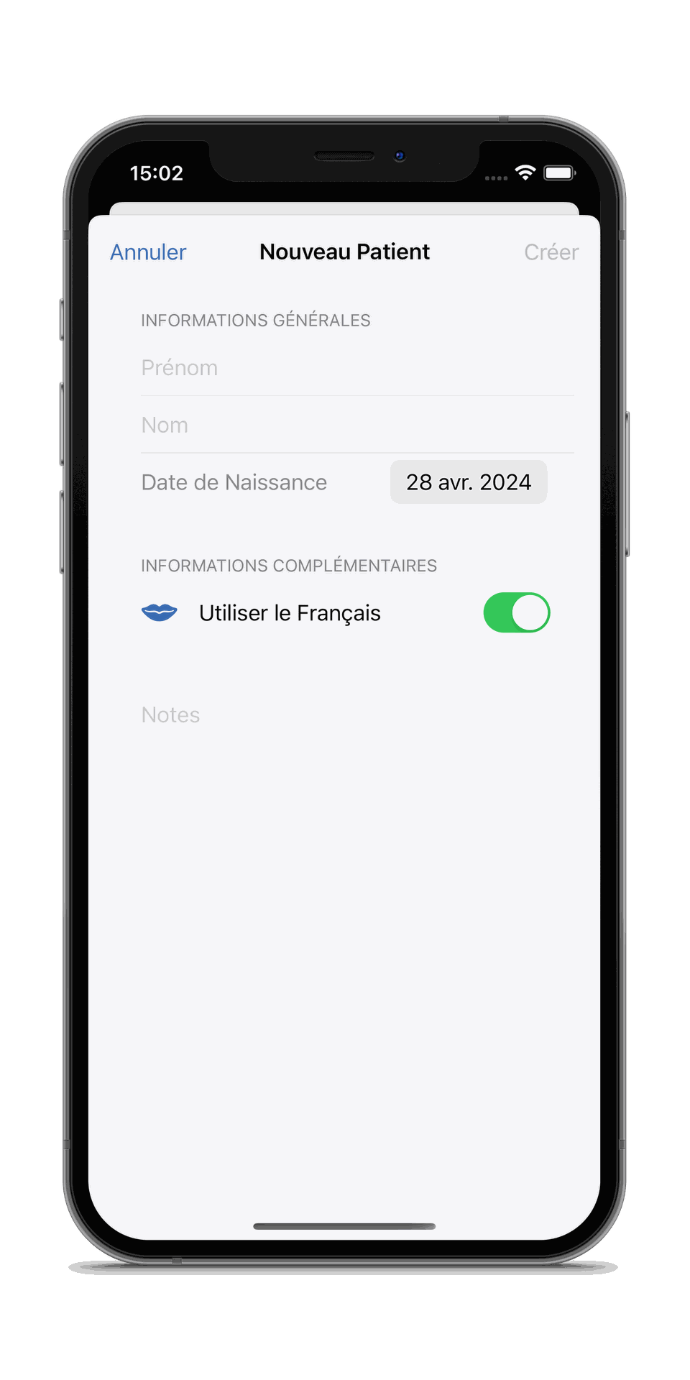
General Information
To create a patient file, you must complete:
- Name
- Given Name
- Date of Birth
The date of birth is crucial as it determines the annualized data set used by the application to determine the patient's "score."
Be aware, if the patient is too young or too old, a warning will be displayed.

The application will then use the data closest to the subject's age.
Additional Information
If the patient takes the exam in a language other than the one chosen in the settings, it is possible to switch and use another language.
A note text field is also available to you
List and Patient File
The search bar allows you to search by name - first name or first name - name any patient registered in the application. By touching a line, you access the patient file.
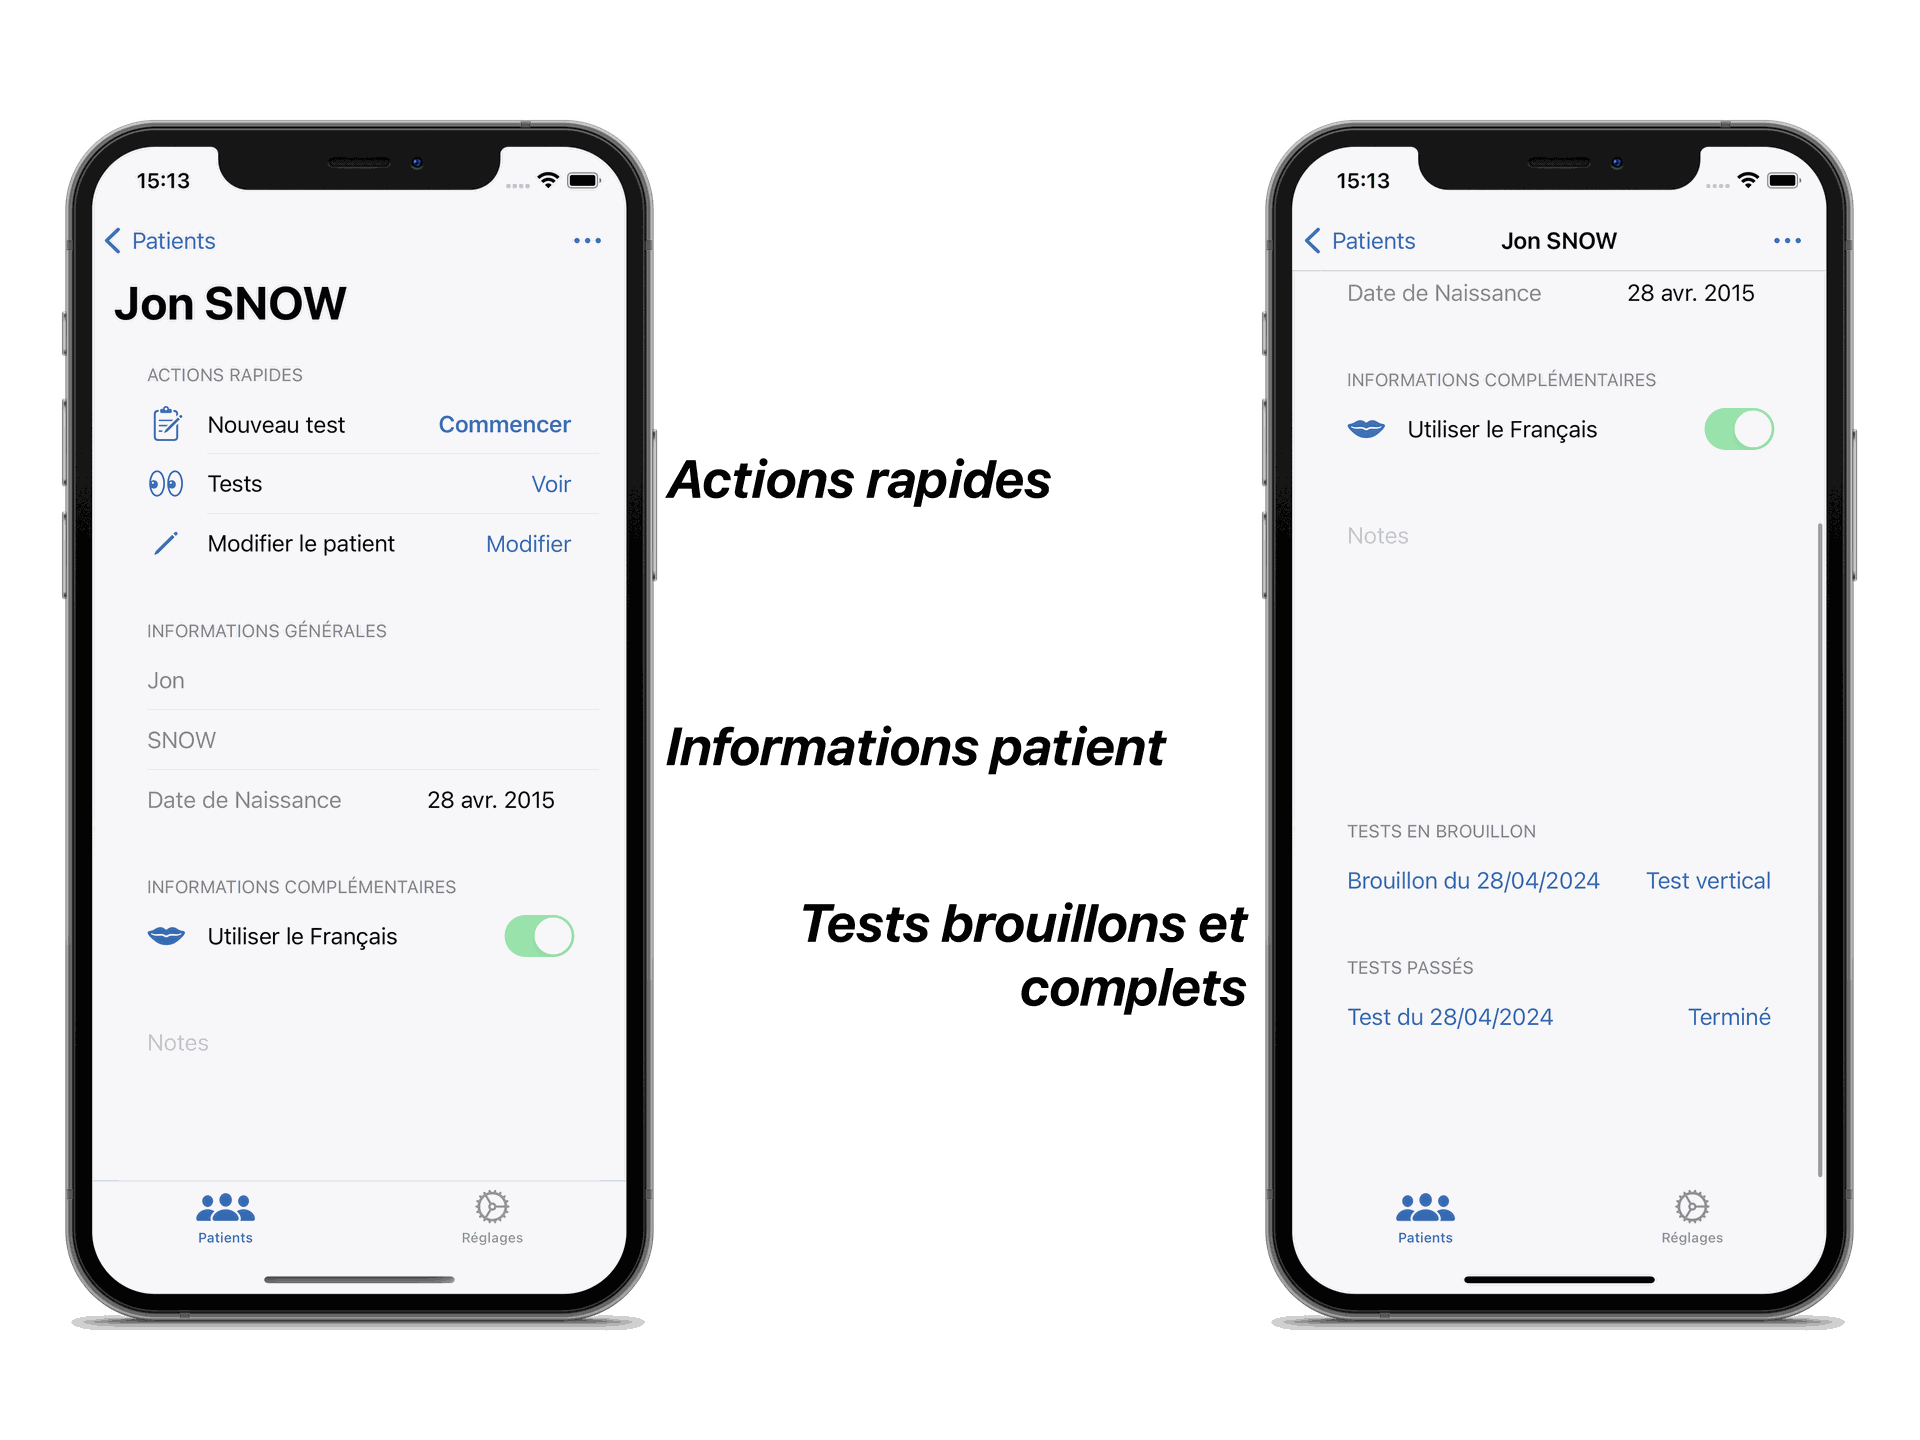
Quick actions allow you to start a new test, see past tests, or modify the patient; the fields then become editable, and all data can be modified.
Tests
Create and Configure
When a new test starts, a page allows you to verify the data and configure the potential recording of the test. During a test, the terminal goes into "exam mode." Exam mode manipulates the application's interface to limit handling errors:
- Disappearance of the bottom navigation bar
- Disappearance of the back button in the top navigation bar
- On iPad, confirmation is required when using the side navigation bar
Exam mode allows you to focus on administering the test, which is often very quick and a source of stress for the practitioner.
An iPad during exam mode
Recording
You can enable recording of the test by activating the camera.
Permissions to access the microphone and your device's rear camera will be requested. If you accidentally click refuse, don't panic, you can reactivate the permissions in your iPhone or iPad settings by clicking on "Easy DEM" in the list of applications.
Version du test
Since version 1.1.0, you can select the version of your test sheet. By default, the setting will be the one chosen in the settings, but it is also possible to change the test version used for a single test during its configuration.
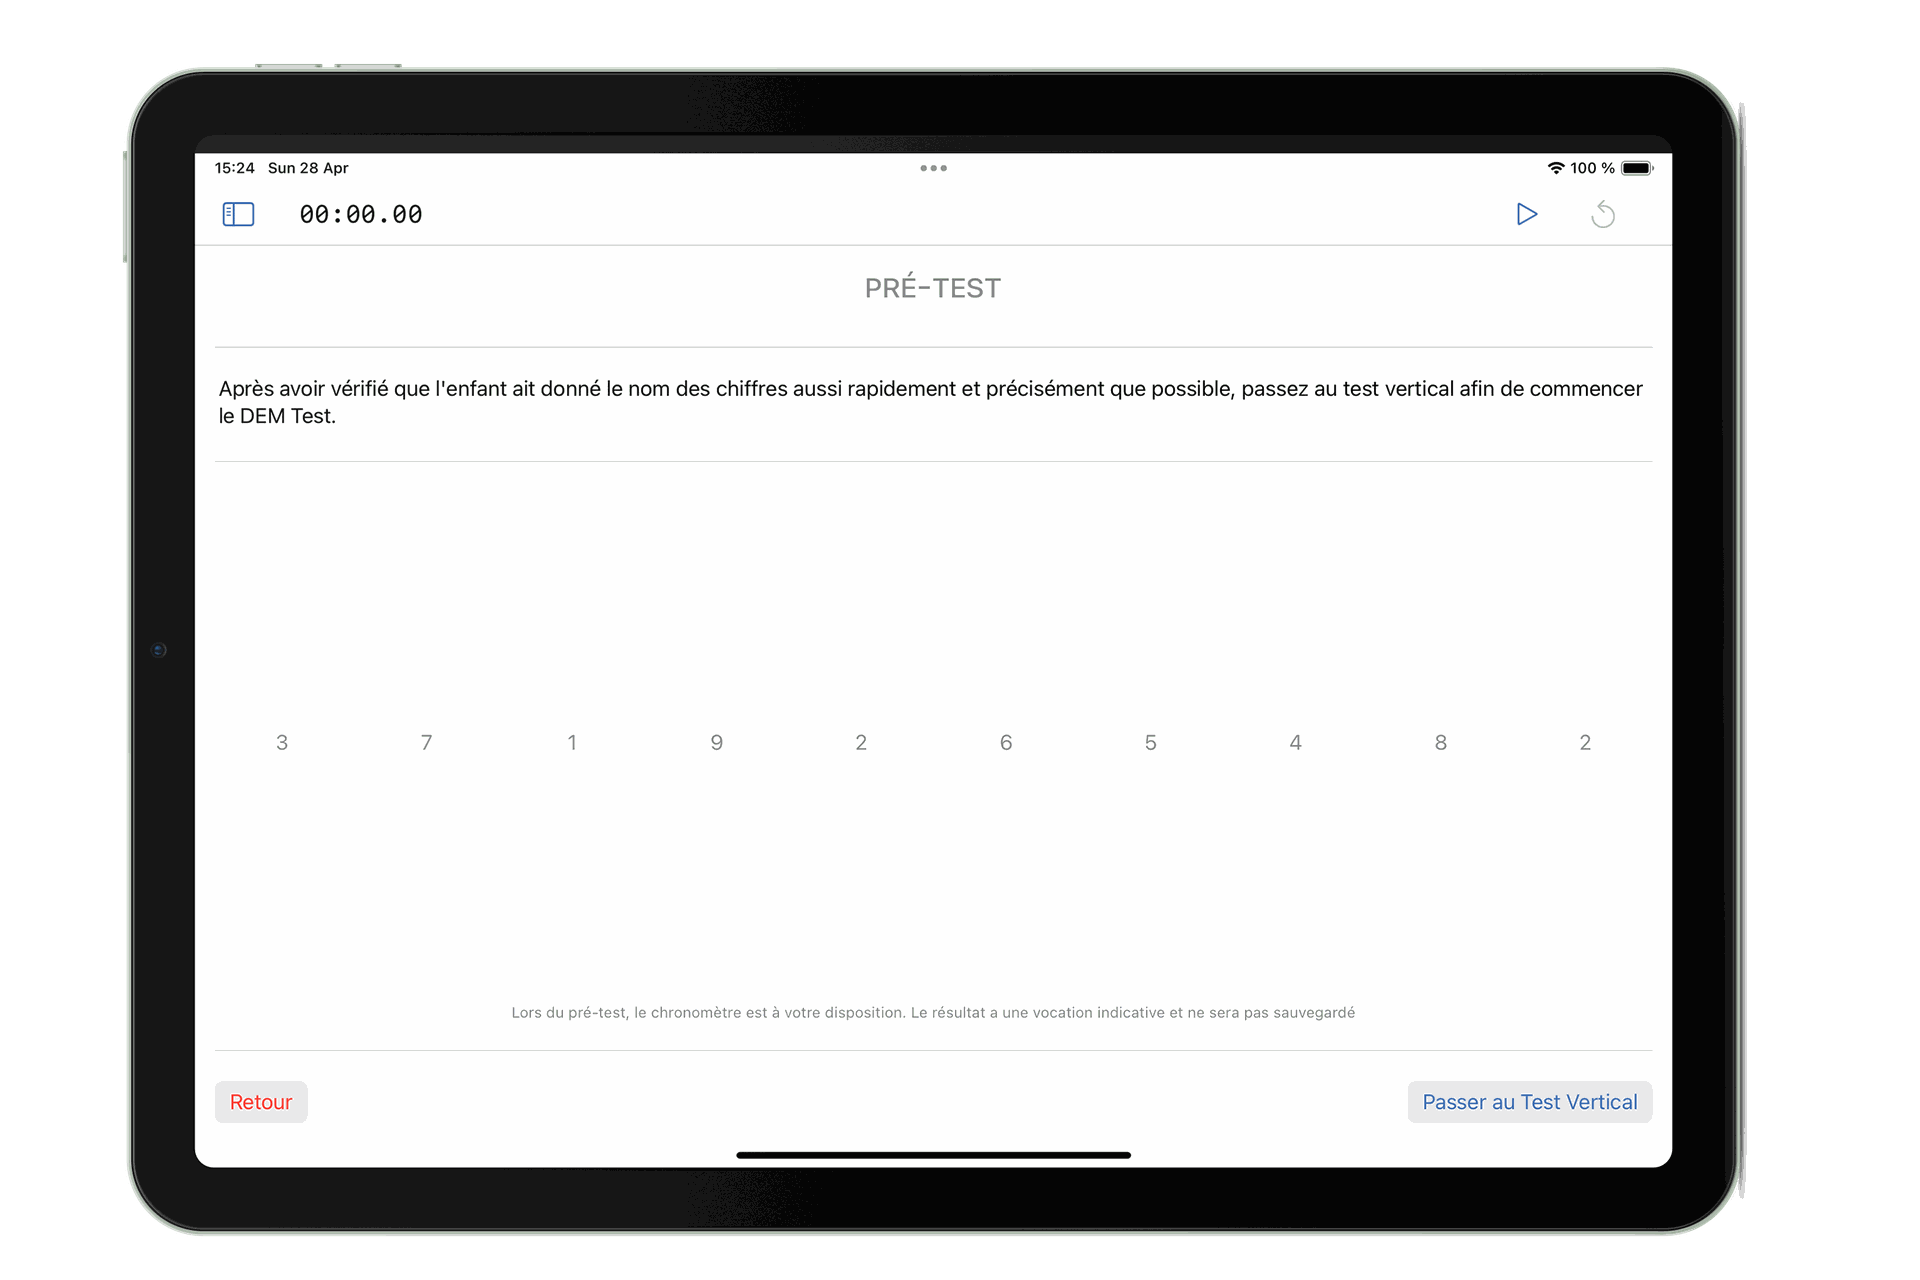
Pre-Test
A fundamental prerequisite of the DEM Test is the child's ability to clearly enunciate numbers, so Easy DEM incorporates the Pre-Test step to verify this prerequisite.
During this step, you have a stopwatch that will accompany you throughout the test. However, as indicated in the DEM Test manual, version 2.8 (2016), there is no time requirement stated for the completion of the pre-test.
The stopwatch, therefore, has an indicative interest for the pretest.
Test passing
The administration of the DEM Test revolves around three tests: two vertical reading tests, and one horizontal test.
The first two tests share the same interface; the last, with a more complex evaluation, has a more elaborate interface allowing for scoring according to the evaluation criteria of errors by omission, addition, substitution, and transposition.
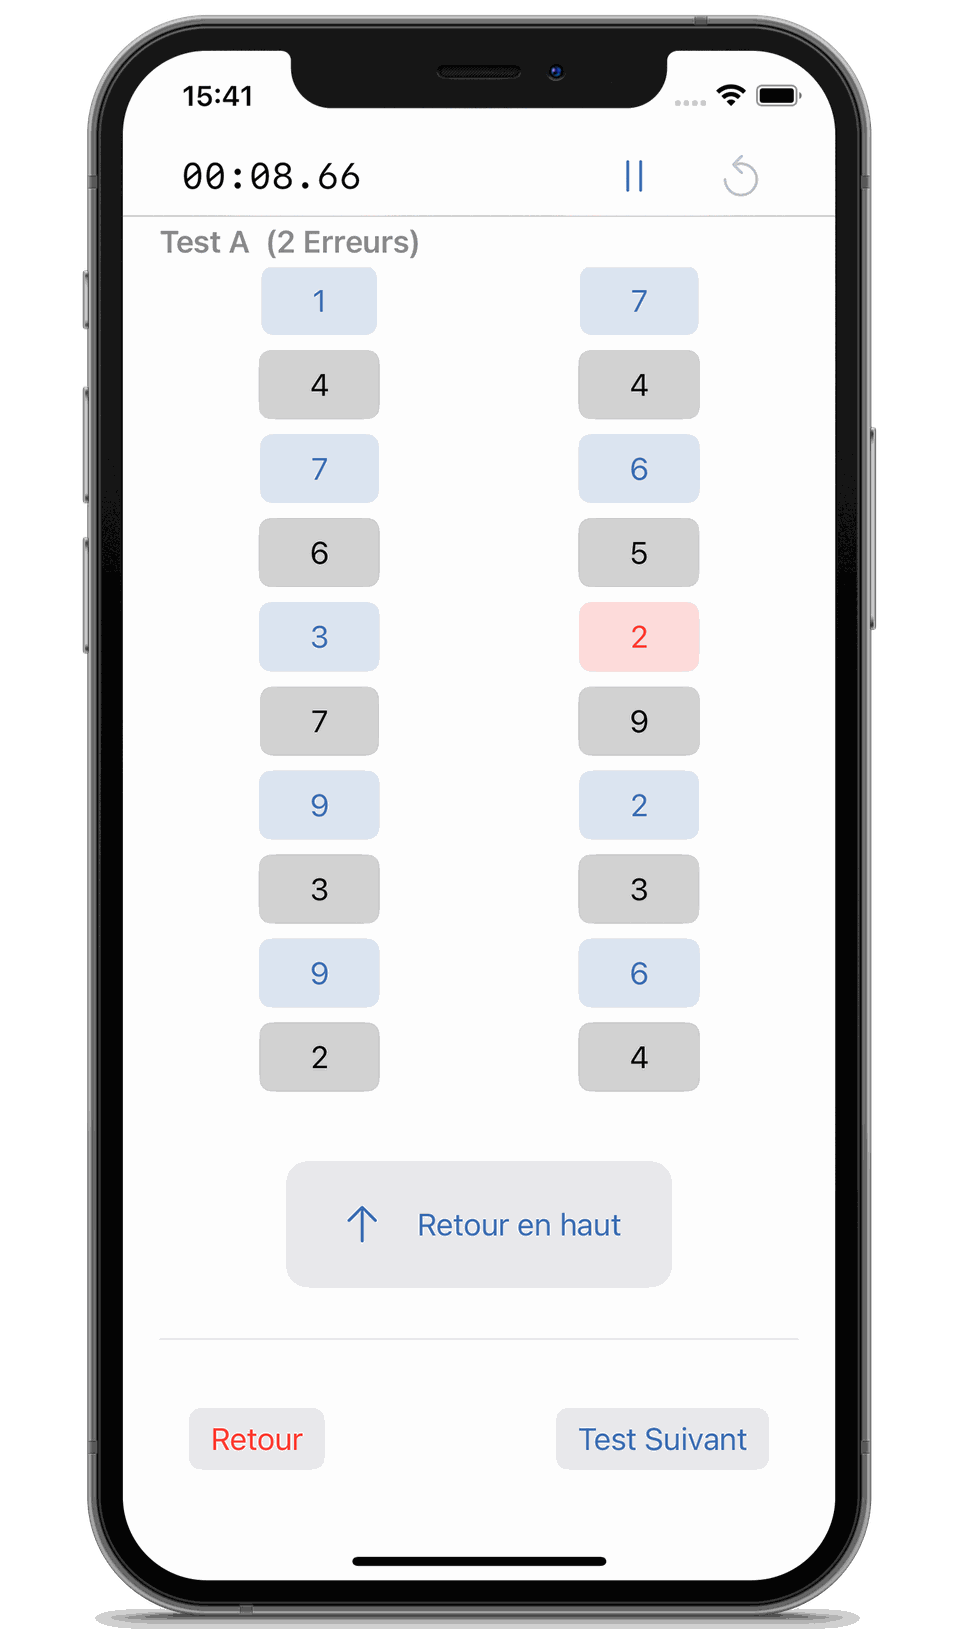
Test vertical (A et B)
Top Bar
Start the stopwatch at the actual beginning of the test. If there is a handling error, it is possible to reset it.
Test Area
The central area contains the columns of the DEM Test. You can mark a number "in error" by touching it.
It then turns red, and the header "Test X" will display the total number of errors.
For the record, the type of error (Omission, Substitution, Transposition, and Addition) is not taken into account in the vertical calculation.
According to the V2.8 2016 manual, vertical errors do not factor into the positioning of the child regarding the "Errors" metric.
A "Back to Top" button is available at the end of the columns, to allow for quick return to the beginning of the second column.
Bottom Bar
The back button allows returning to the previous test, to the patient file, or to delete the test.
Returning to the patient file will save the test in drafts. You can then resume it later.
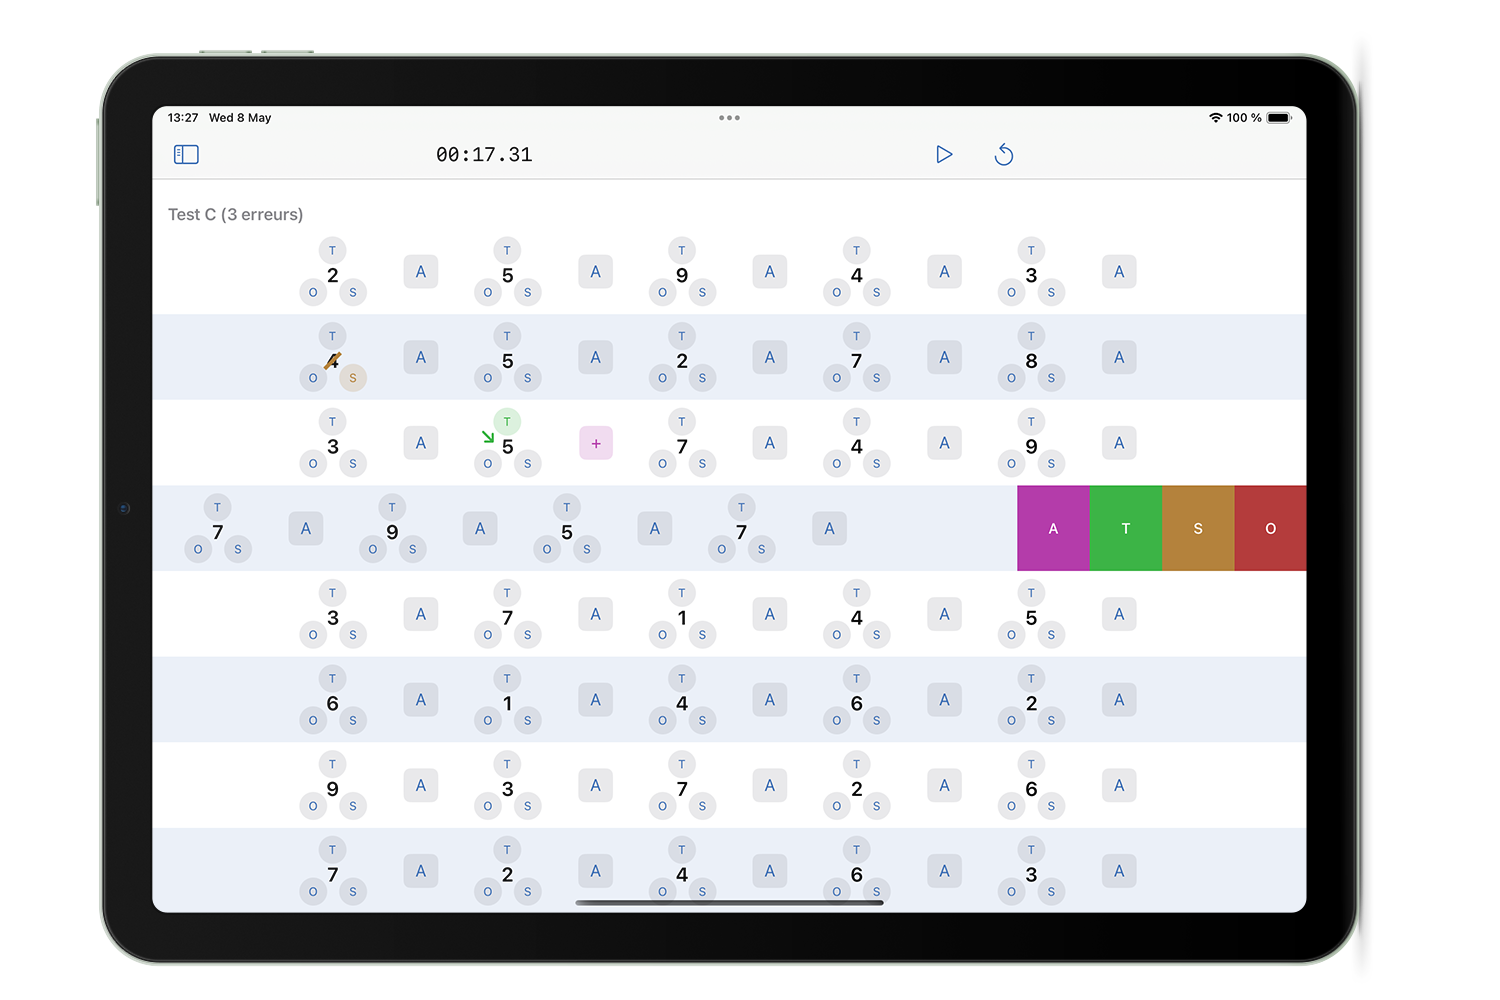
Horizontal Test (C)
The horizontal test, functionally much more complex, benefits from an interface designed to minimize friction during administration. For complete mastery of the interface, it is advised to watch the Easy DEM presentation video.
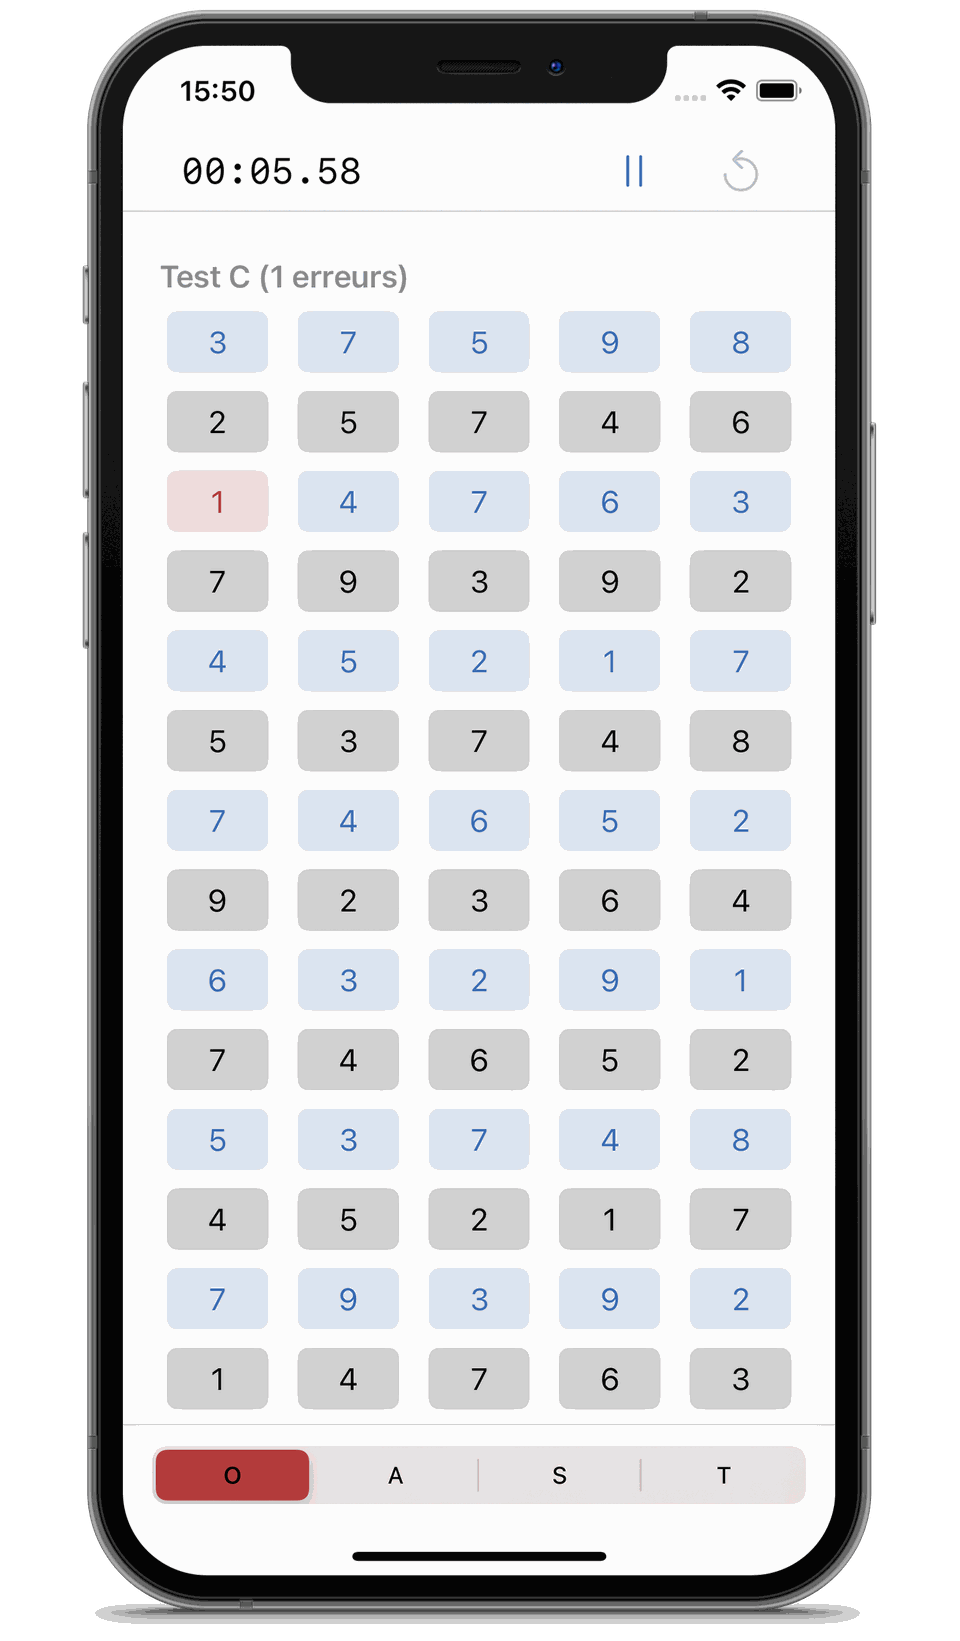
Top Bar
Find the familiar stopwatch. Start it at the beginning of the test and then forget about it.
Test Area
This time, the interface displays the data from the horizontal test. More densely packed, this visualization remains legible, thanks to the use of a color-themed alternate.
Just like with the first tests, you simply tap to mark a number as erroneous.
However, the functional complexity of the test requires Easy DEM to add an error type selector.
Bottom Bar
This time, the bottom banner consists of a segmented picker.
This familiar interface allows, with one hand, to choose the type of error made by the patient (Omission, Addition, Substitution, Transposition) in order to mark the concerned area with a single tap on the screen.
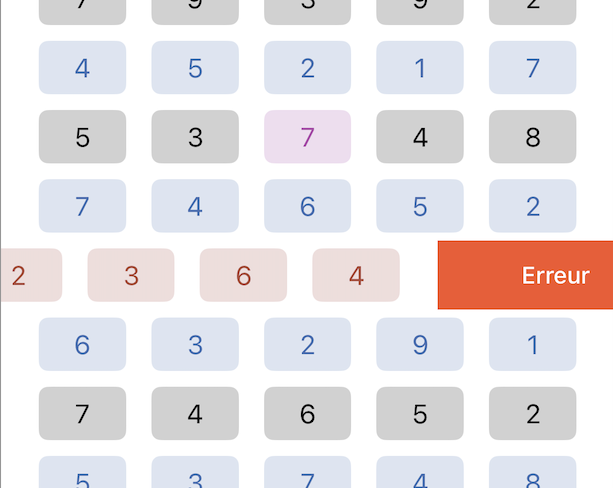
If the patient makes a mistake on an entire line, it's possible to use a shortcut to mark the whole line at once. To do this, select the error type (e.g., O if the patient skips a line) and swipe the line to the left, the whole line will then be counted, saving you 5 clicks.
Conversely, in case of a mishandling, it's possible to clear the line of all its errors by swiping it to the right.
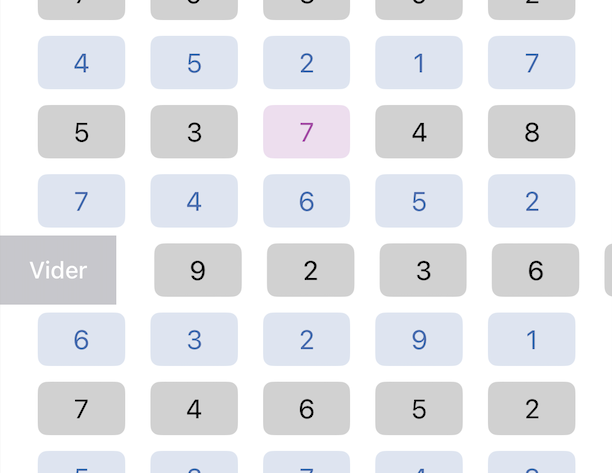
Numerous "Quality of Life" features are present on the horizontal test page; for example, it is possible to change the error type by selecting another type in the segmented selector and then touching the misclassified error again.
It is also possible, if the selected error type is the same, to go back by touching the concerned box again.
Upon validating the horizontal test, you immediately access a summary of the patient's results.
Optimized for iPad
The horizontal test (Test C) is functionally extended. Thus, the test interface on the iPhone had to deal with limited space while ensuring a maximum user experience.
Since the iPad does not have this screen real estate issue, the horizontal test has a specially designed iPad view that takes advantage of the screen size.
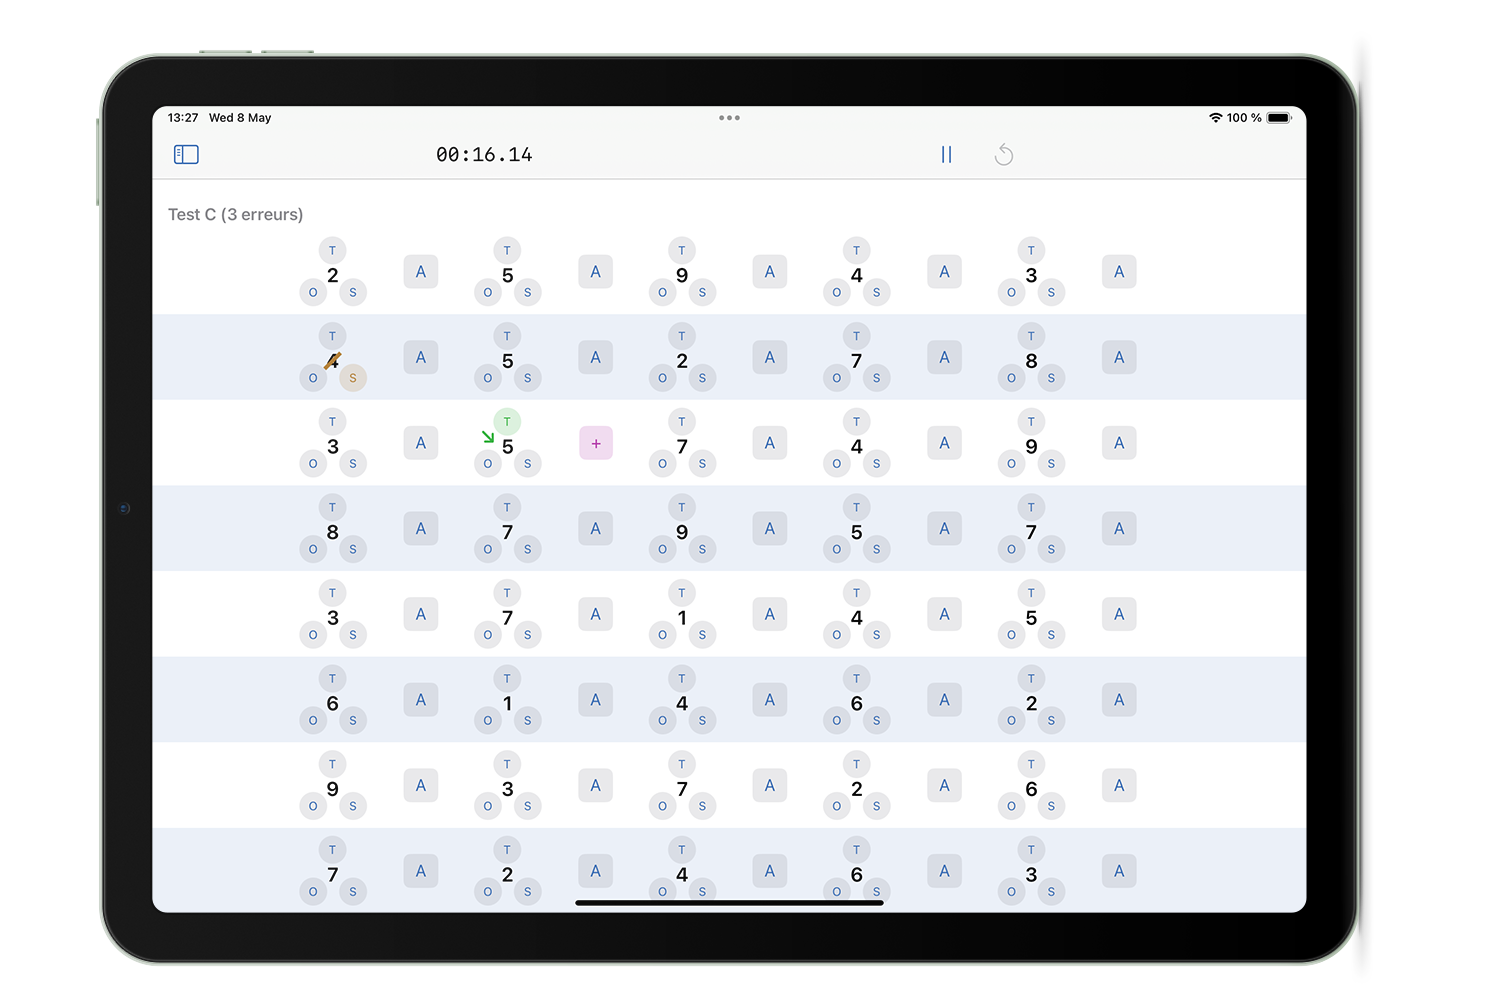
On iPad, each number now has 3 buttons (Transposition, Omission, and Substitution). Clicking on one of these buttons logs the error, and decorates the number according to the DEM® Test guidelines by encircling, crossing out, or arrowing the number according to the type of error reported.
Addition has been moved between the numbers, to more visually represent the position of the addition error.
It is still possible to reset or declare an entire line in error, using a swipe to the right or left. The error choice is then made by tapping one of the four buttons. The default error chosen in the case of a complete "swipe" is omission
Existing Test
It is also possible to enter into the application a test conducted previously, on paper or any other official Bernell® medium. To do this, the patient record menu "..." has the option "Enter an existing test," which displays an input window.
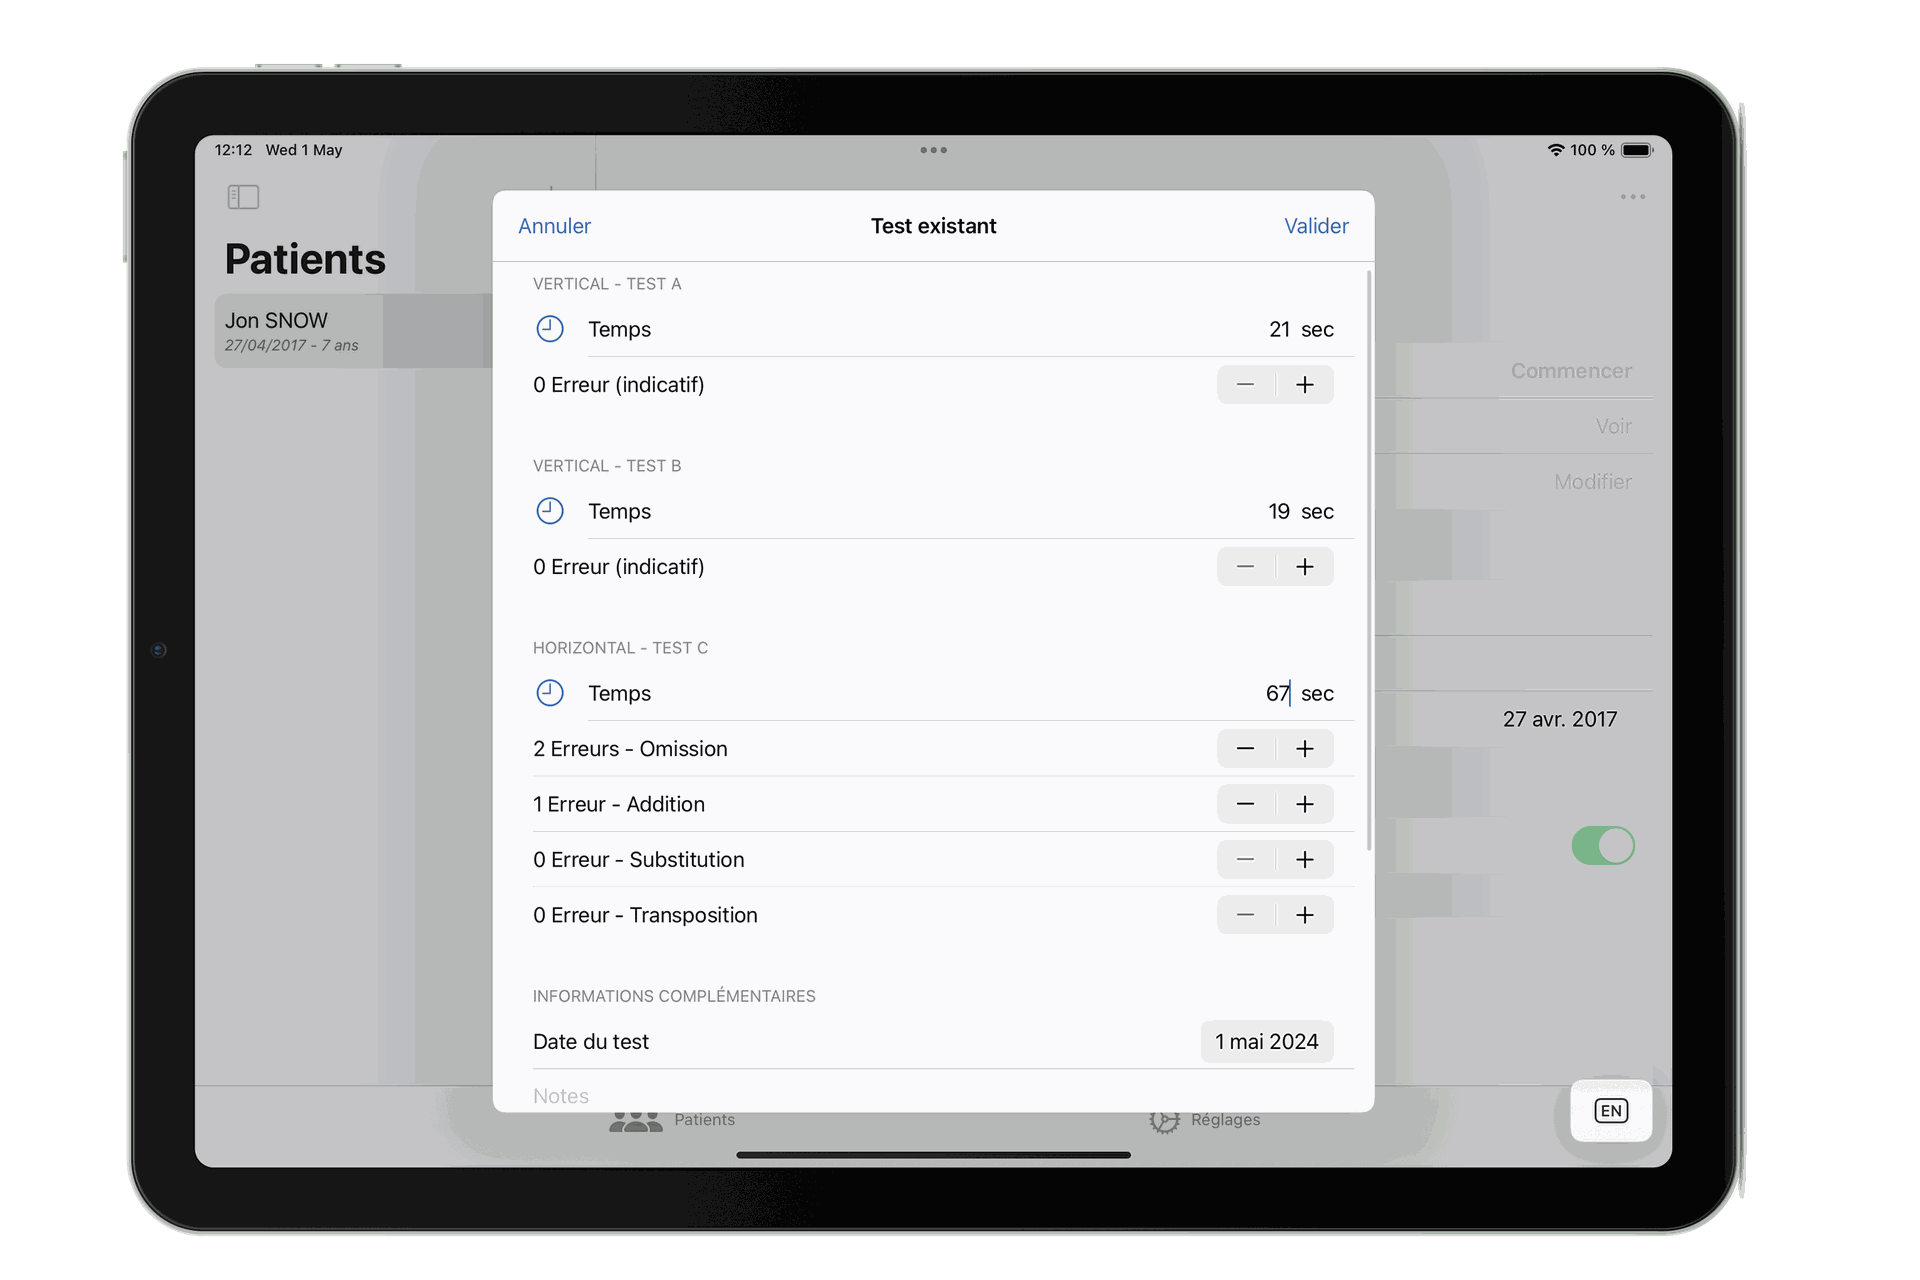
Once the test data has been entered, validate the test, and it will join the list of tests assigned to the patient and will be viewable in the same manner as tests conducted within the application.
Results
At the end of a test or manual entry, the save occurs automatically. Your test will then be available on the patient record, and you will access the results visualization.
Visualization
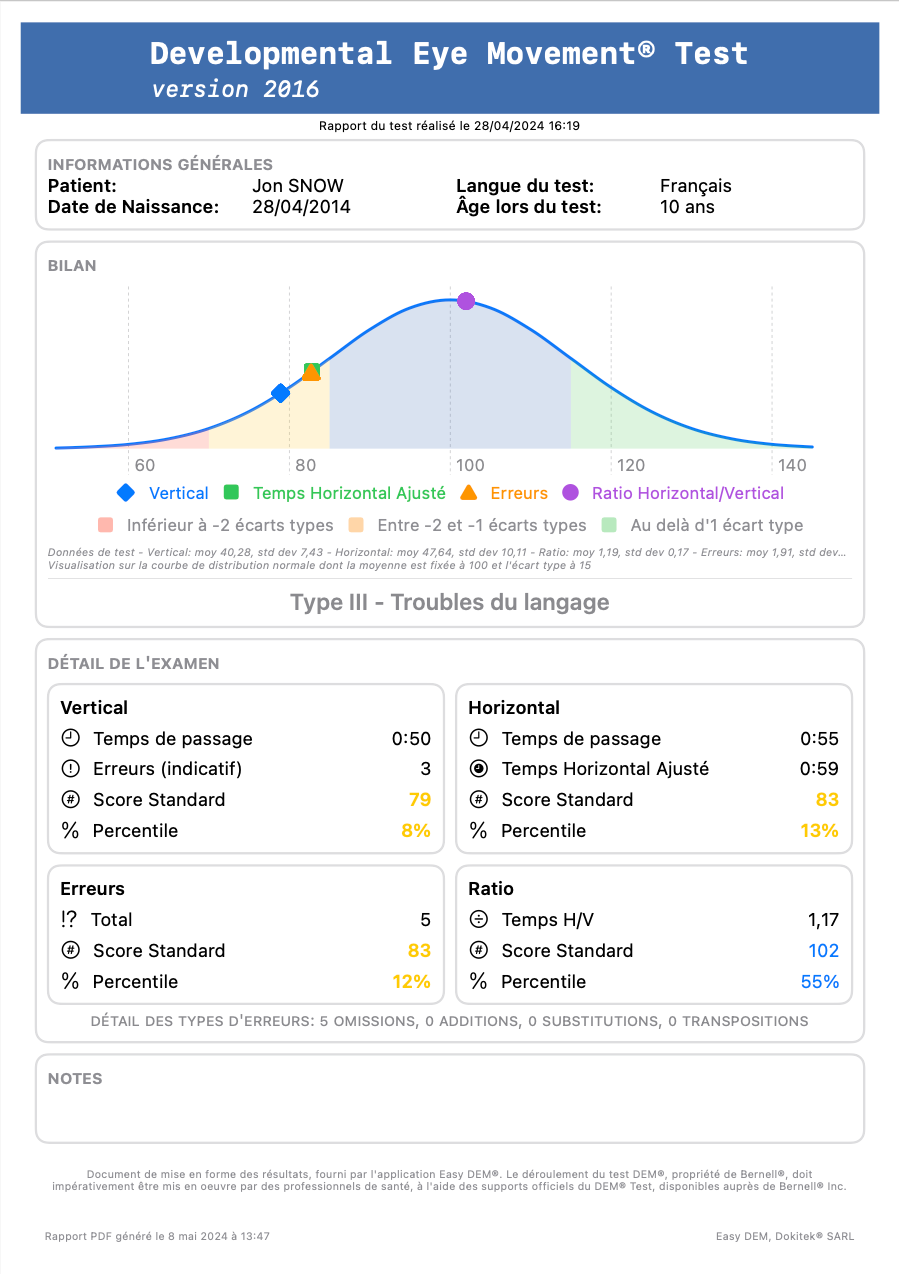
The results visualization page presents at first glance a visual representation of the subject's positioning:
A normal distribution curve on which the 4 metrics (Vertical, Adjusted Horizontal, Errors, H/V Ratio) are positioned allows one to recognize at a glance the "abnormal" deviations of a subject.
The application will also attempt to propose a diagnosis (type I, II, III, IV) if the results are significant, in accordance with the DEM® Test guidelines.
The legend is available by clicking on the curve
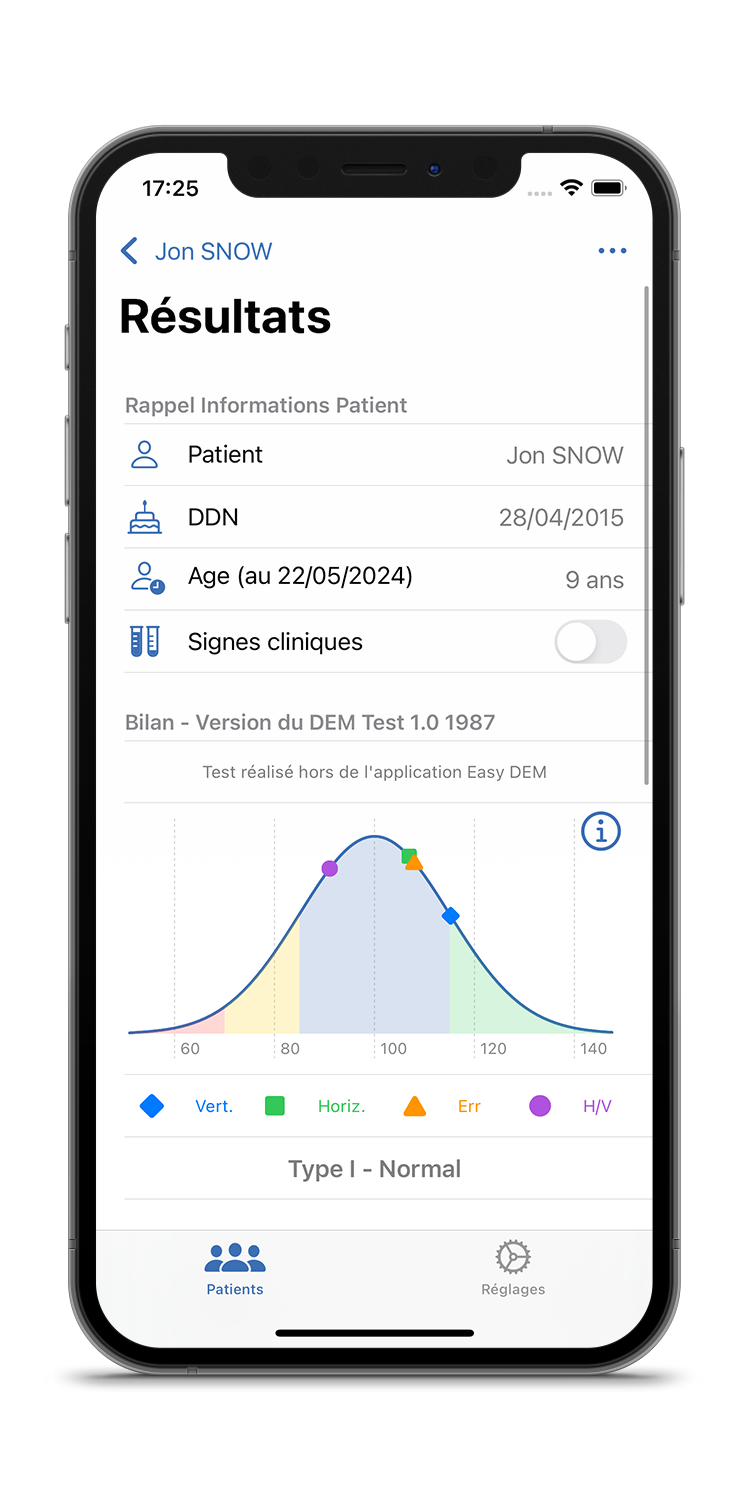
Below the curve, a detailed reminder of each metric is available, each time with the standard score and percentile associated with the raw result, depending on the patient's age and spoken language.
If you opted-in for the audio/video recording of the test, the recordings will be available between the curve and the metrics.
Editing and Sharing
Using the additional menu "...", it is possible to edit the test or share a PDF report. Editing takes you back to the desired subtest, giving you free rein to manipulate the results as you see fit. This feature is particularly appreciated if, upon reviewing, you discover an error that slipped through the cracks.
PDF Report Example
The PDF report includes all the information available on the test summary, adding below the normal distribution curve the data used for the calculation of the results (mean and standard deviation of each of the metrics).